We've automated file syncing with Procore so you can stop re-uploading documents by hand. Connect once per project, and E1 keeps your tender documents in step with the latest versions in Procore, saving you time and keeping your supply chain on the right set.
This guide walks you through connecting Procore to a project on E1, importing your documents, and managing revisions.
Before you start: You'll need E1's app installed from the Procore Marketplace and the right permissions set up in Procore. See the Procore Installation and Setup Guide for step-by-step instructions. This step is completed once, in Procore, before you come into E1.
Who can use it: The Procore integration is available on the Builder Core subscription and above. If you're on Builder Basic, you won't see the integration option.
1. Open the integration setup
- Go to the Documents page within your project.
- If you're using the Project Setup Wizard, you'll also find the integration button there.
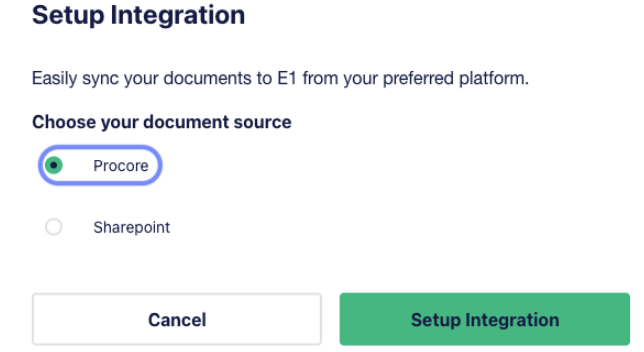
- Click Setup Integration.
- If more than one integration is available, sSelect Procore.
- If Procore is the only option, you'll be taken to the next step automatically.
This step is completed for each project individually, every time you create a new project. It connects one E1 project to one Procore project.



2. Log in to Procore
- Clicking through will redirect you to Procore to sign in.
- Sign in with your Procore credentials. If you're already logged in, E1 will bring you straight back.
- Once you're authenticated, you'll land back on the setup screen in E1.
3. Select your company
- Choose the Procore company you want to connect.
- Most builders will only have one company here. If you're connected to more than one, pick the one that holds your project.
4. Select your Procore project
- Choose the project you want to pull documents from. Use the project number, name, or address to find the right one.
- You can connect one Procore project to one E1 project, a one-to-one link.
A Procore project that's already connected to another E1 project won't appear in this list. If you can't find the project you're after, it may already be linked elsewhere.
5. Choose the folders and files to sync
- Select which folders and files you want to bring into E1 - you can select from Documents, Drawings and Specifications in Procore
- All files and sub-folders inside a selected folder will be included and synced.
- Private folders in Procore stay locked. E1 respects the permissions set on your Procore end, so anything private there won't import.
- You can change this selection later.
6. Confirm and start importing
- Review your selections on the summary screen.
- When you're happy, click Confirm and Start Importing.
7. Initial sync
- A loading screen appears while your files pull across from Procore. You can keep working in another tab while this runs.
- Once it's done, the page refreshes to show your synced files.
- You'll know you're connected when you see Connected to Procore at the top-left of the Documents tab.
8. Automatic and manual syncing
Once you're connected, E1 syncs in the background. This works exactly the same as the post-award integration.
- When documents change in Procore, you'll see a green dot next to your Documents tab
- Inside the Documents tab, you will see a yellow banner describing the changes.
- These indicators appear from within the project, so you won't see them on your main project list. Check inside the project itself.
- To check manually, click the three dots next to Connected to Procore and select Check for New Updates. You'll also see the date and time of the last sync here.
- After a manual check, refresh the page to see the new files.
There can be a short delay before the green dot appears after a change in Procore, so give it a moment and refresh if needed.
9. Managing new and revised documents, issuing an addendum and notifying subbies
Any new or revised files in Procore flow through to your Documents section automatically.
- Revised files are marked with a Revised tag; brand-new files are marked with a New tag.
- Click through the Review Updates prompt to start the addendum.
- Give the addendum a name (for example, Addendum B) and a description. E1 summarises which documents are new and which have been superseded.
- Head to the Document Matrix to organise your files into the right folders and packages. Use Show addendum docs to see only what's changed.
- Amend your trade packages if you need to, then finalise the packages and notify affected subbies. The subbies who need the update are auto-selected.
- Subbies are notified by email that a new set is ready to download.
Revision or addendum? You'll see both terms across the platform. Procurement calls it a revision and tender calls it an addendum. They work the same way: a change to your set that your subbies need to know about.
10. Changing your file selection or disconnecting
- Click Change File Selection to add or remove synced files and folders later.
- Removing a file from E1 won't affect your files in Procore.
- To disconnect, go to the E1 project that's linked to the Procore project and disconnect from there.
There's currently no view in E1 showing which E1 project a given Procore project is connected to, so keep a note of the pairing if you manage a lot of projects.