Step 1 - Completing the New Project Wizard
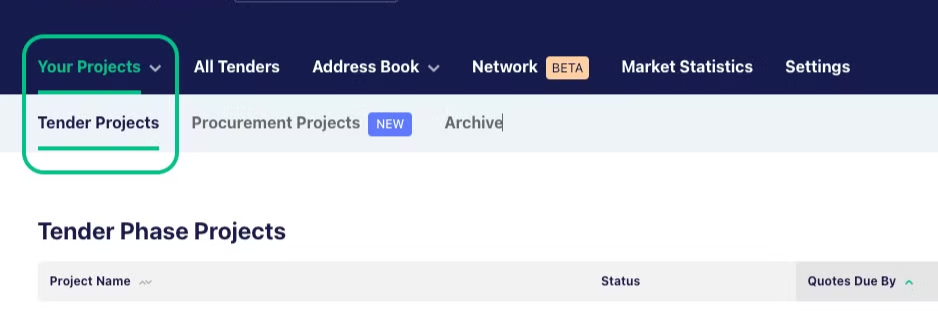
Head to the Your Projects tab then the Tender Projects tab
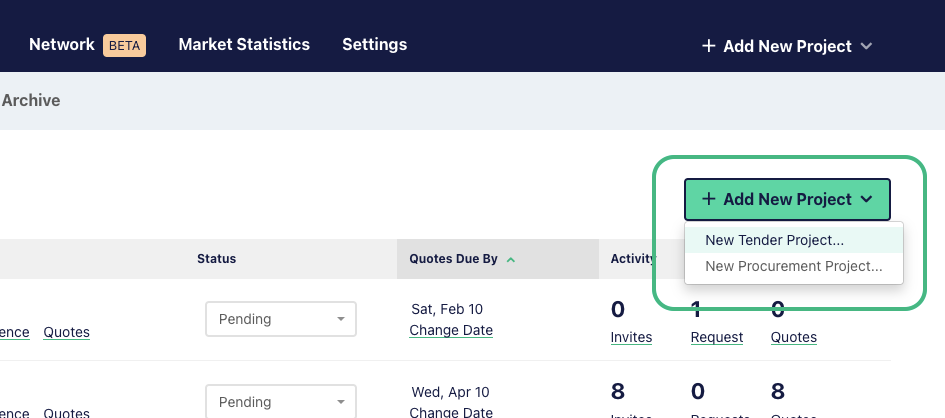
Click on ‘+ Add New Project’ and select ‘New Tender Project’
Complete the project details using the New Project Wizard
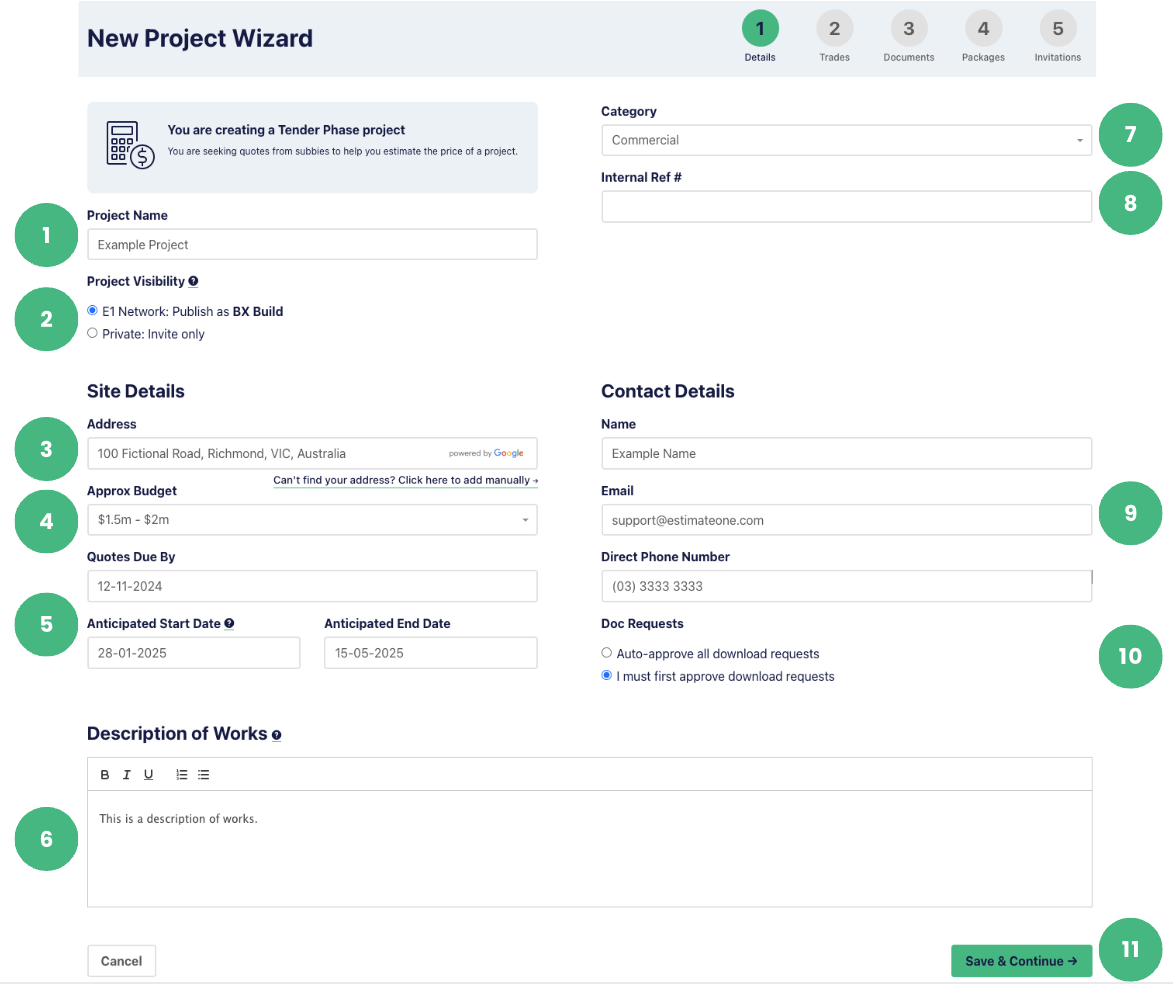
1 - Add a Project Name. If another builder has already created the project with a similar name, you’ll be prompted to select the existing project or continue with a new project after saving the Project Wizard.
2 - You can set Project Visibility to either visible on the E1 Network, or set to private:
- E1 Network: Publish as [builder name]
This option will publish your project to the E1 Network with your company name visible to all subcontractors and suppliers with access to E1.
- Private: Invite Only
Your project is not discoverable by the E1 Network as it isn't published on the tender noticeboard. Subcontractors and suppliers only gain access to the project details when you send them an invitation.
3 - Add the site address, start typing the name and select from the list, or click the ‘Can’t find your address…’ link below the Address field to add it manually.
4 - Select the total Approx Budget from the dropdown list.
5 - Add the Quotes Due By date and Anticipated Start and End Dates for the project.
6 - Add a brief Description of Works. Adding a description can be helpful for your invited subcontractors as a quick and easy summary of the project and any important details you may want to provide at the start.
7 - Select the best-fit Category from the Category dropdown menu
8 - The Internal Ref # is an optional field for internal project numbers
9 - The logged-in user's details will automatically fill the contact details area with their Name, Email and Direct Phone Number. If you would like to change this to a different estimator, you can manually do this in the Contact Details section
10 - You can choose to make all documents available without the need to approve each download by selecting ‘Auto-approve all download requests, in the Doc Requests section. Alternatively, you can select ’I must first approve download requests’ and will then be able to accept or reject a subbie or supplier’s document access on a case-by-case basis.
11 - Once you’ve completed all sections, click ‘Save & Continue’
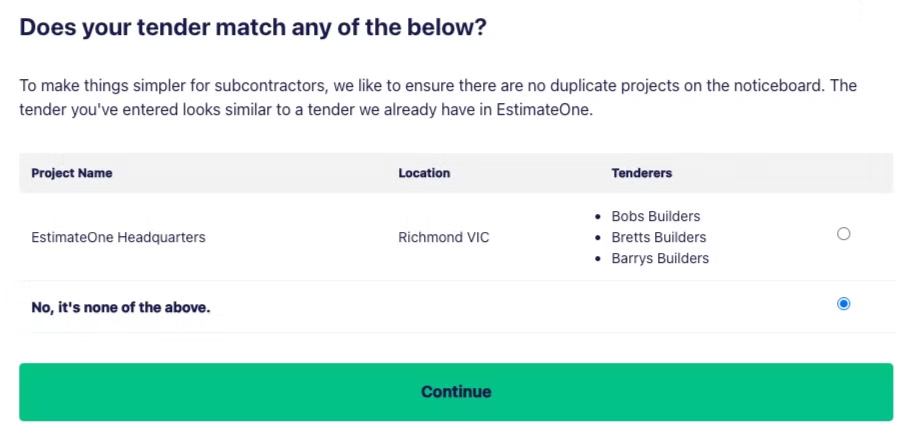
Step 2 - Confirming if a project is new or existing
If the name of your project is similar to projects that already exist on E1, you will be prompted to select from joining a current project or creating a new project.
If you see a match, add your project to the existing tender by selecting the button next to it, it will provide you insights into the projects you have publicly competed against other builders on, as well as maximise quote coverage as it streamlines the noticeboard for subbies and suppliers.
If any options shown are not the same project, select ‘No, it’s none of the above’, then click ‘Continue’.
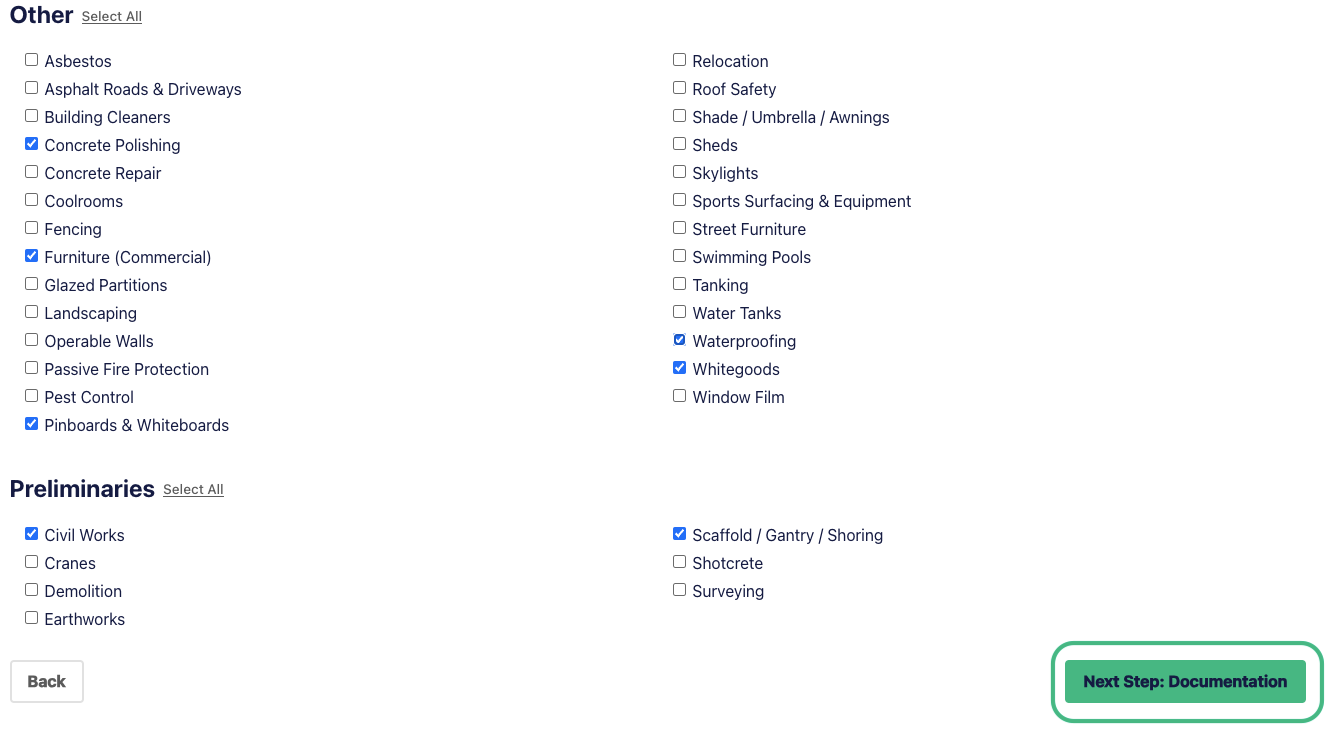
Step 3 - Trades selection
You’ll now be prompted to select all trades required for your project.
To do so, click the tick box next to each required trade. You can also ‘Select All’ or ‘Deselect All’ from a category to quickly nominate or remove all trades in that section.
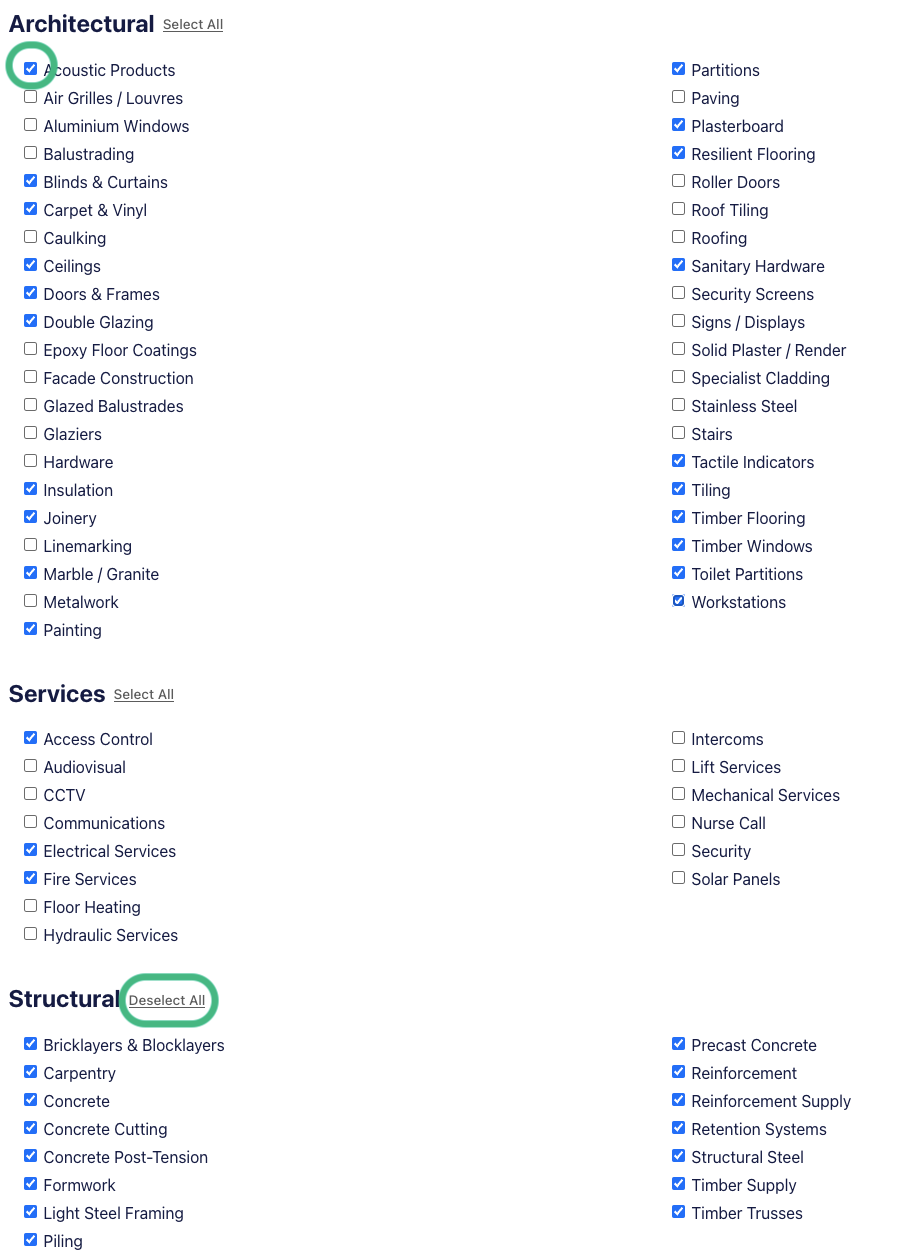
Once you have selected the necessary trades, click ‘Next Step: Documentation’
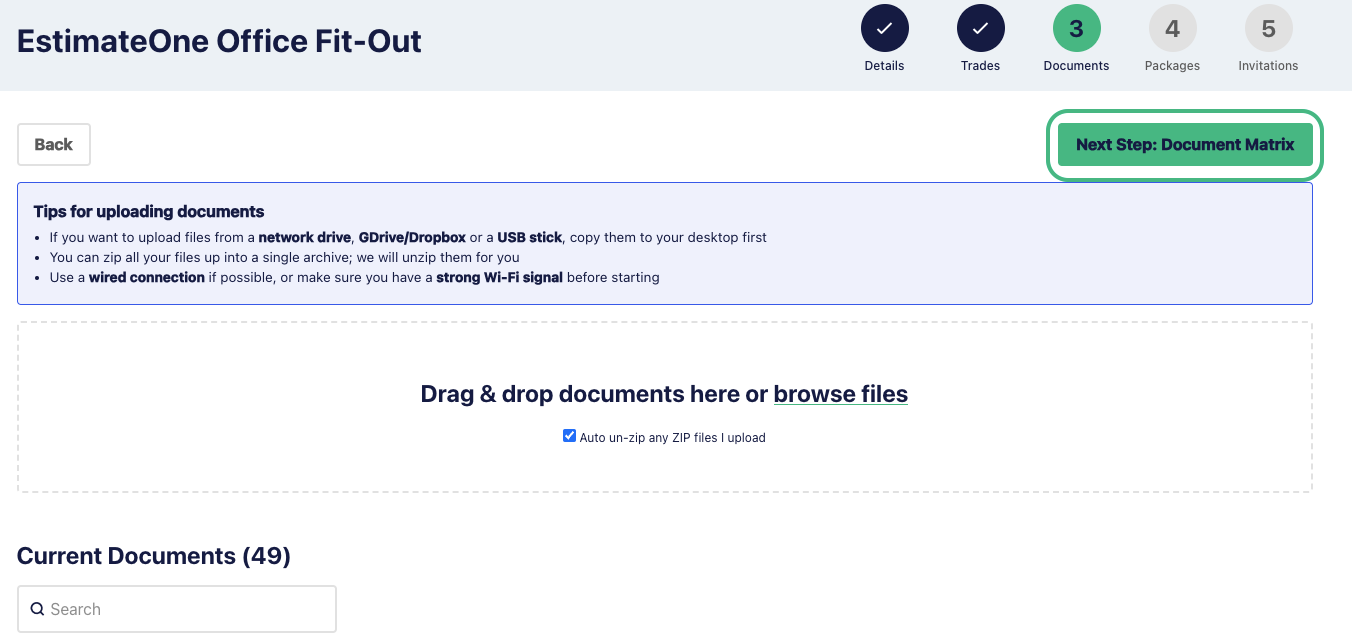
Step 4 - Adding project documents
To add documents to your project you can either drag and drop from your file explorer, or click the ‘browse files’ button to manually select them.
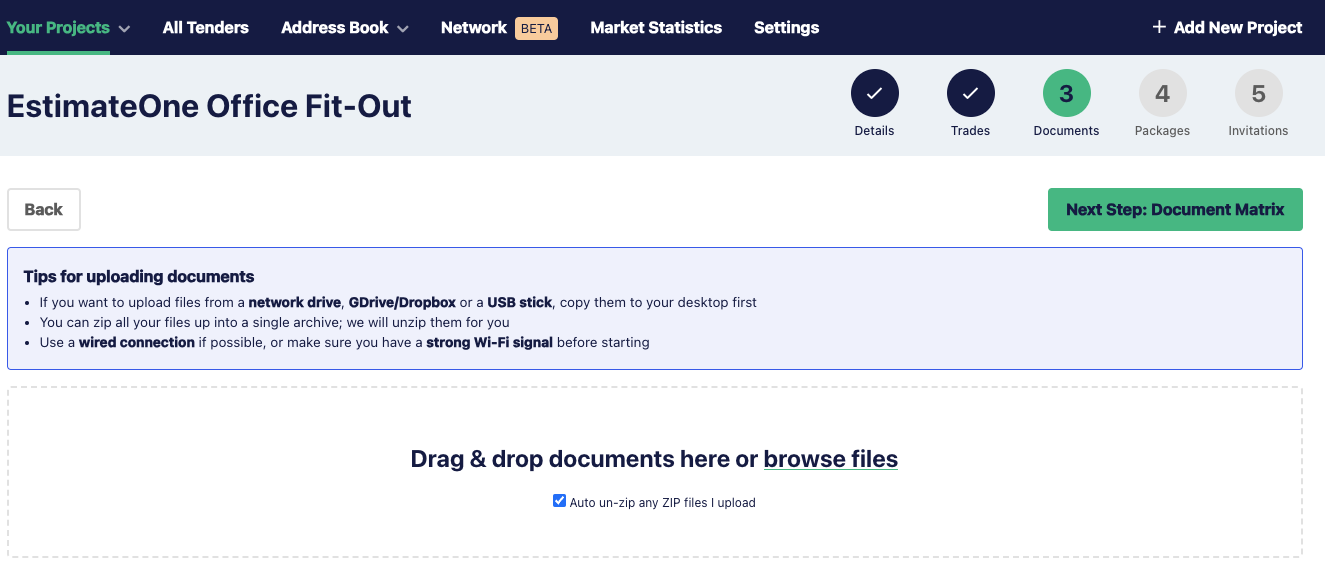
Once your documents have been added to your project, you can review and manage them. Check this article for an overview of editing options.
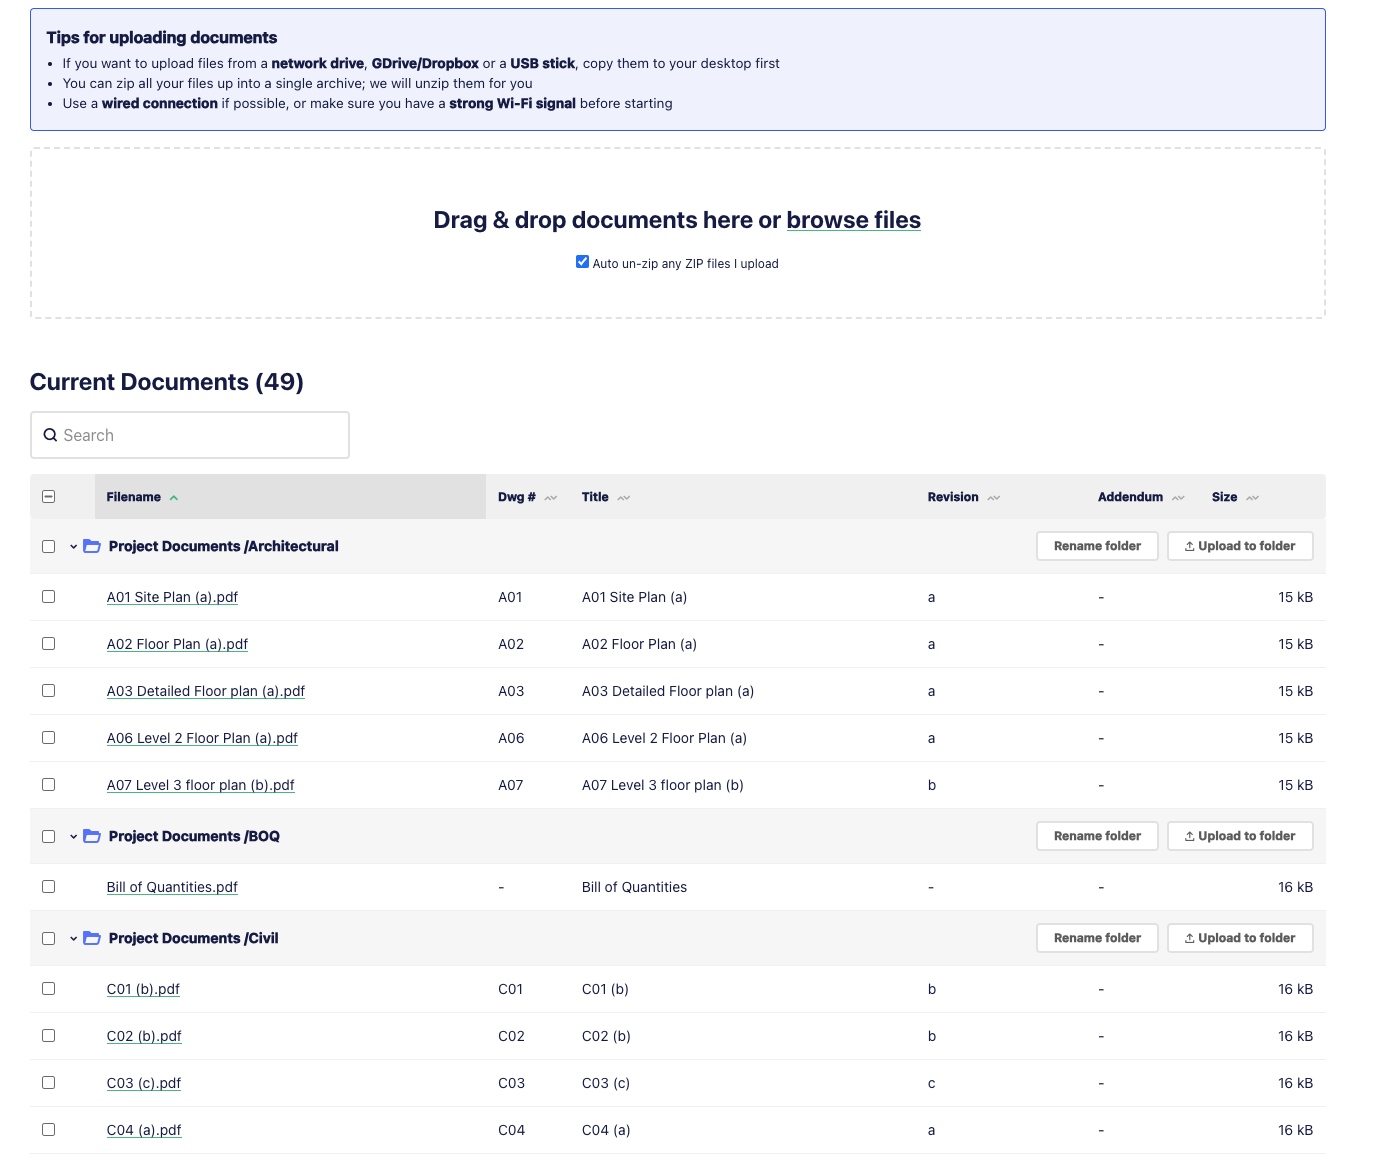
When you are happy with your document structure, click ‘Next Step: Document Matrix’
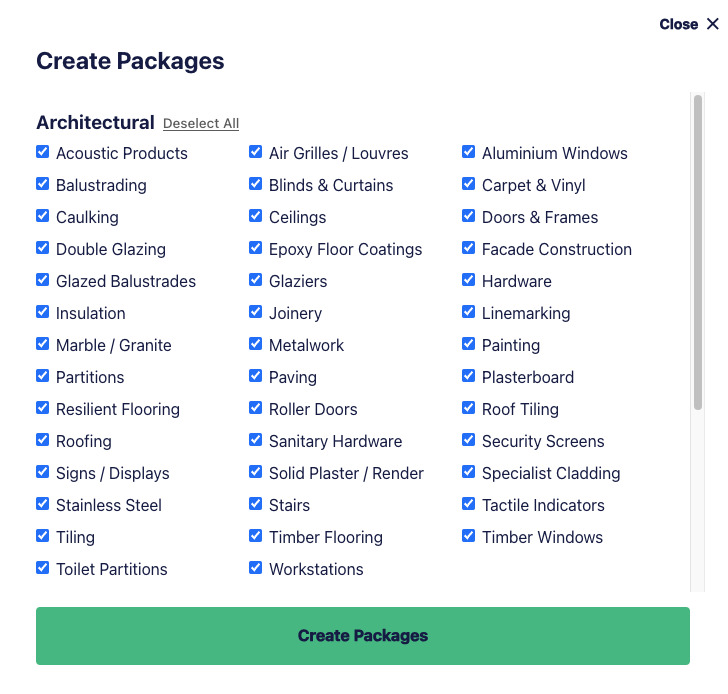
Step 5 - Creating Packages
You will be prompted to create packages based on the trades you selected earlier.
Packages make it quick and easy to send invitations and correspondence based on a trade or package. You can deselect any trades no longer required, or keep the previously nominated packages.
When you’re happy with the selection, click ‘Create Packages’.
Step 6 - The Document Matrix
You can now interact with the Document Matrix by clicking the individual squares to add a document to a package
The Document Matrix allows you to select which documents will be sent to each trade discipline via the packages.
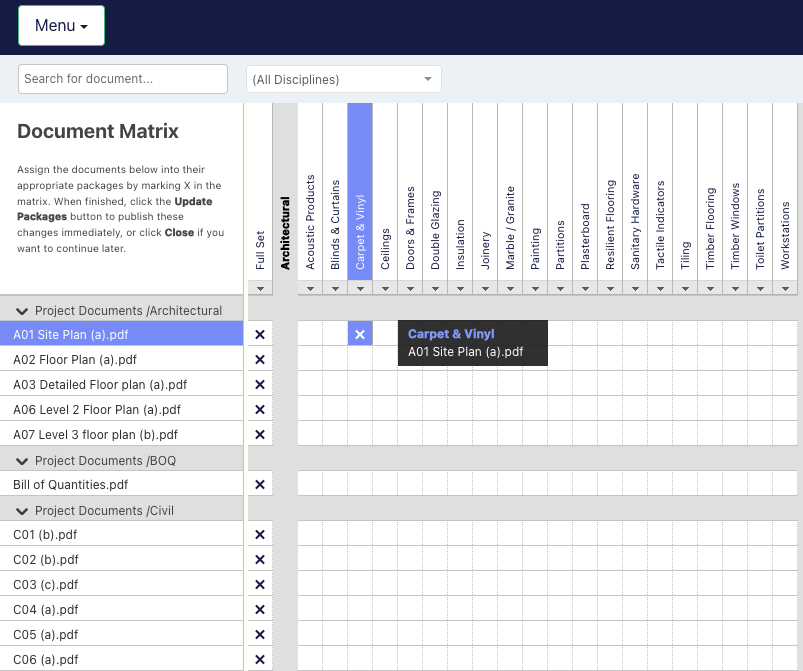
You can click and drag your cursor to select multiple documents and packages at once, and then type "X" or press ‘Enter’ to add those documents to the package(s)
For more detailed instructions on the Document Matrix, click here
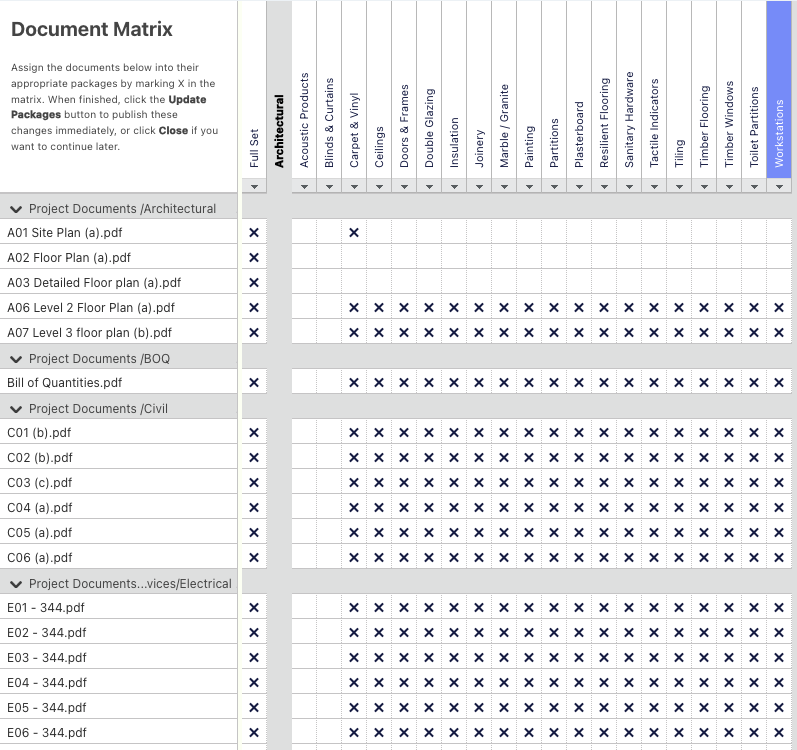
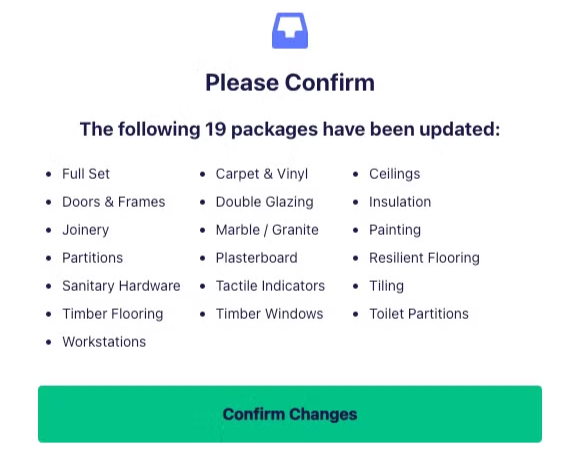
When you’ve made your selections, click on ‘Finalise Packages →’

This will prompt you to confirm, click ‘Confirm Changes’
Step 7 - Sending invitations
You can send multiple invitations at once through E1 by selecting the Package from the left hand side.
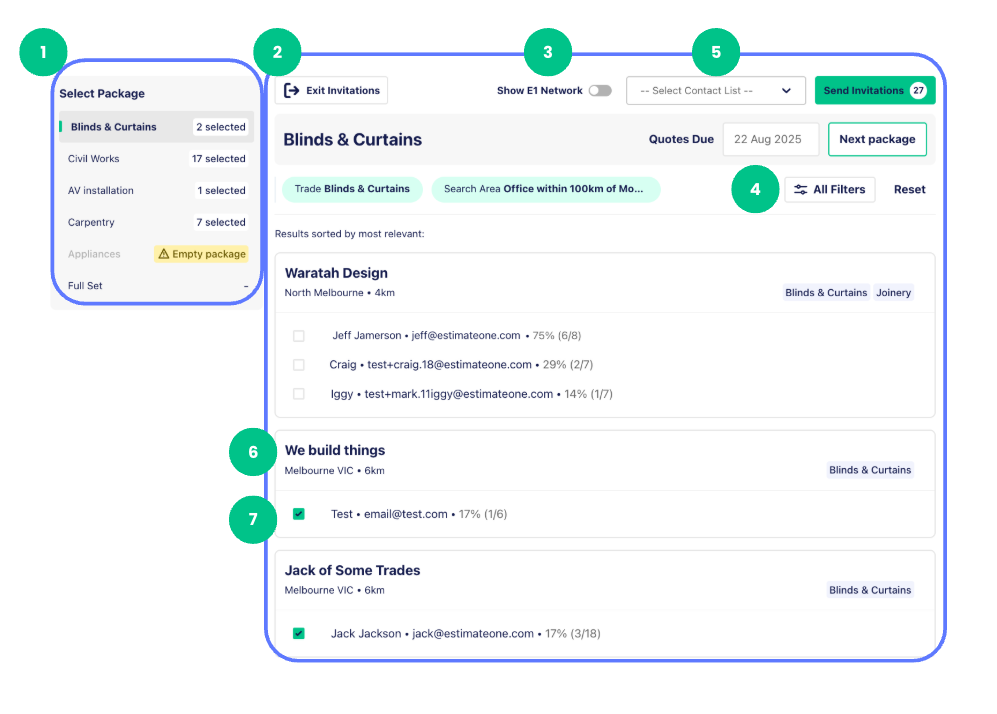
1. Selecting Packages (Left Sidebar)
This panel shows all the packages in your project and how many invitations have already been sent for each.
- Click on any package to begin inviting subcontractors
- As you switch between packages, your selections are automatically saved
- If a package says "Empty", it means no documents have been assigned yet, and it hasn’t been set up
2. Selecting Contacts (Centre Panel)
Here’s where you select who to invite for the chosen package:
- Your Address Book contacts are shown by default
- Use the checkboxes to select which companies to invite (7)
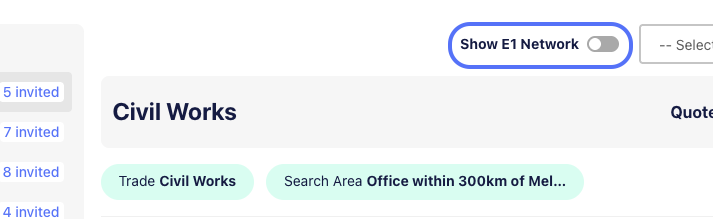
3. Maximising your coverage with the E1 Network
Select Show E1 Network (3) to display companies that match the current package trade and any applied filters.
- This allows you to access a wider pool of subcontractors, helping you increase quote coverage and find the best-fit businesses for your packages.
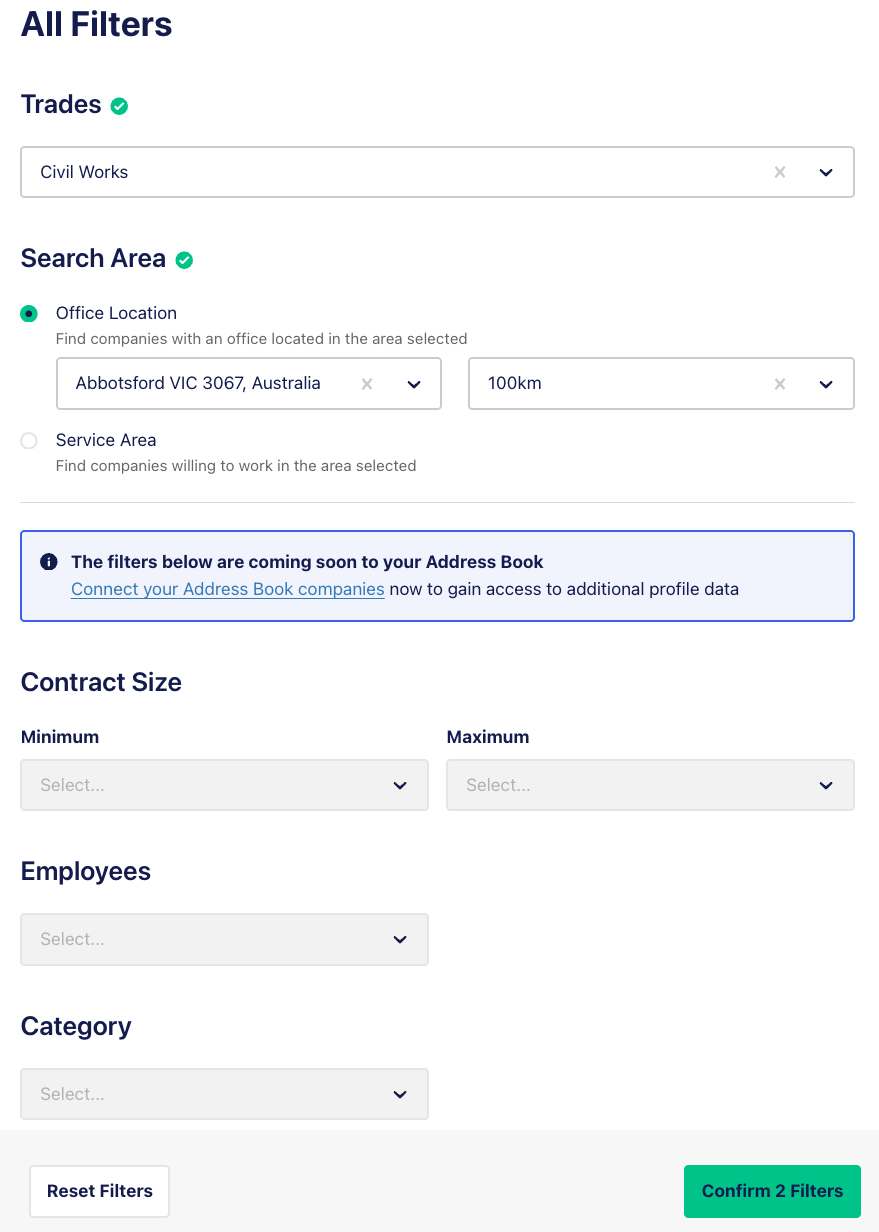
4. Filters - Available for Network
Click the Filters button to refine your results based on:
- Location
- Contact Size
- Company Size (Employees)
- Category
5. Applying a Pre-Set Contact List (Optional)
You can also select multiple contacts at once by applying a Contact List. To do this, click on ‘Apply Contact List...’
- Select a pre-made list
- This will select subcontractors across all relevant packages
- You can still add or remove contacts after applying the List
- You can see which has been applied once it is selected in the drop-down menu
Issuing Invitations
Once you’ve reviewed all packages and made your selections:
- Click Send Invitations
- You’ll have the option to send:
- Send invites package-by-package, or Queue up multiple packages at once by:
- Clicking Next Package, or
- Selecting a different package from the left panel
- Send invites package-by-package, or Queue up multiple packages at once by:
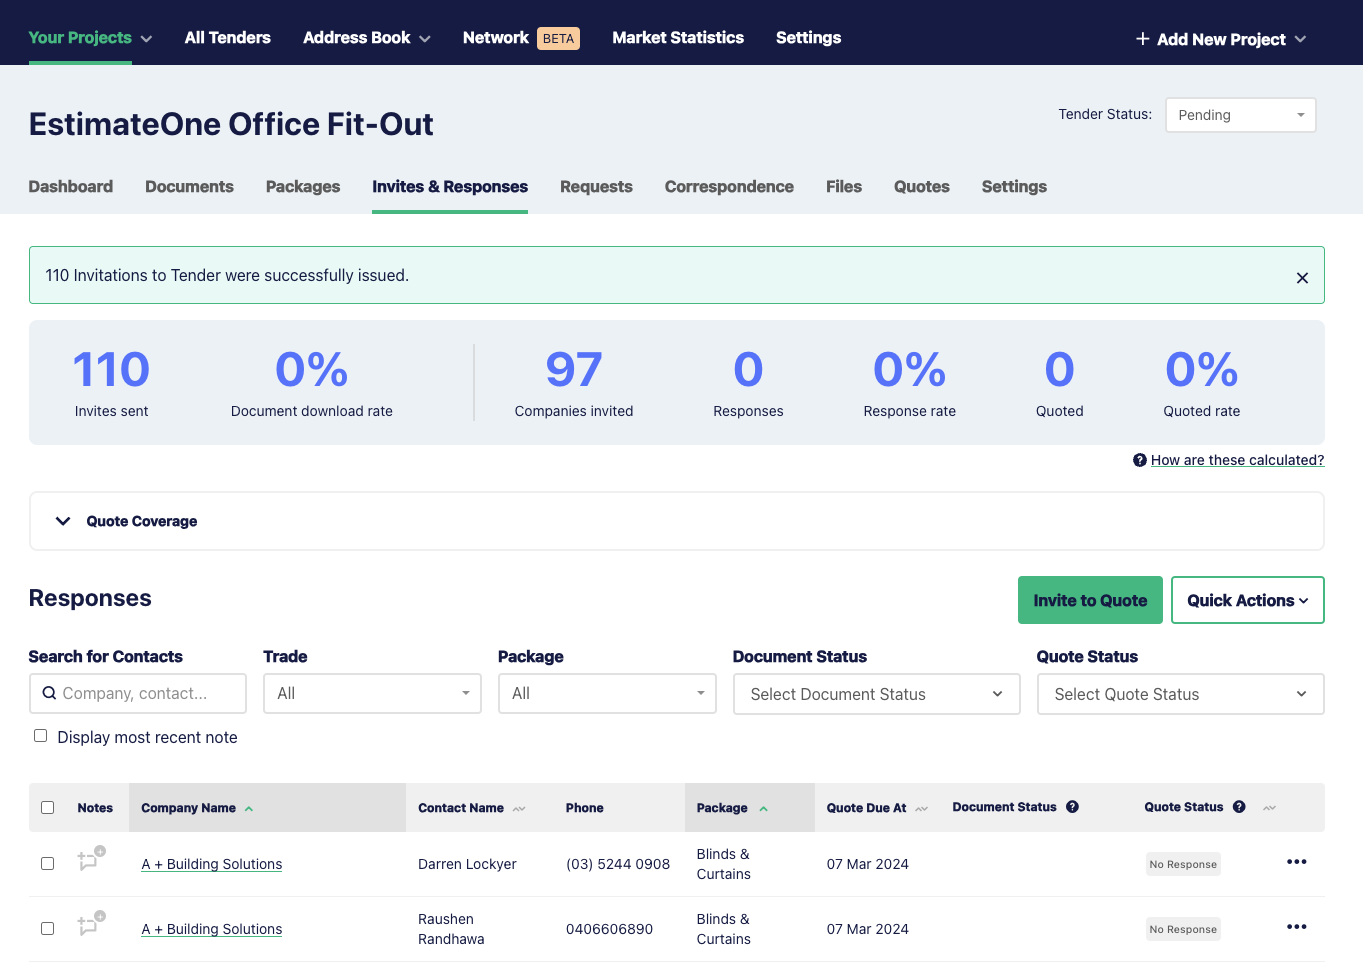
When finished and all invites sent, click Exit to Invites and Response to head straight to the Invitations & Responses tab, where you can manage the project.
Congratulations! You have set up a project on E1!
You can now manage your project from the Your Projects tab. Happy tendering!